To download a GPS data from a GPS, follow the steps below.
1. Connect the GPS to your computer (i.e. using USB cable).
2. Ensure the device is visible in your computer.
3. Start QGIS normally.
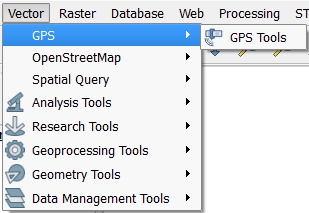
4. Launch the GPS plug-in from QGIS, Vector > GPS > GPS Tools as shown in the image below.
If the GPS sub-menu is not visible under the Vector Menu, it means the plugin is not enabled. To enable the plugin, follow the sub-steps below.
a. Click on the Plugins Menu in QGIS Menu as shown below.
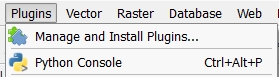
b. Click on Manage and Install Plugins... sub menu.
c. Click on Installed on the left side as shown in the image below. Then look for GPS Tool in the list of plugins in the search box as shown in the image below.

d. When you find the GPS Tool, enable the plugin by clicking on the checkbox in front of the label GPS Tool.
e. Click on the Close button at the bottom of the Plugins module.
A new dialog box appears that allows you to browse to the location of field data from the GPS.

5. Select on the first tab Load GPX file.
6. Browse to the location of GPS data and Click OK.

The loaded data should appear as scattered points depending on what was captured as shown in the image above.
7. Locate the Waypoints layer with a point icon in QGIS Layers Panel. In our example, the Waypoint with a point feature is the first layer. Right-click on it.
8. Select Save as in the shortcut panel and enter the details as required.
9. Specify the format, coordinate system for the new layer. If you do not specify the format, the source layer CRS original will be used as shown in the image below.
Note: For above data, the coordinate system used was: WGS 84.
For the format, ESRI Shapefile format is preferred because it is supported by many GIS software.
Do not check the Skip attribute creation check box.
10. Provide the output path.
11. Click on the checkbox Add saved file to map.
12. Click on the OK button.
A new layer will be created and added to the QGIS map canvas.
